Tuesday, September 20, 2016

Back To School

Well, we have been very busy on the farm lately. In between ripening grapes, and a bumper crop of tomatoes, we started our 4th year of Homeschooling!

We had to take a few silly back to school pictures.

I'm not sure what was so funny...

Smile please!

Purple Cherokee (Heirlooms on top), Medford Tomato below, 
Sungolds & Red Cherry in the bowl.

Purple & Yellow pole beans. I think I see a few peppers in there too!

Pickling Cucumbers (Boston, I think..I'm still looking for the tag).

One of the only pictures I took of ALL of our grapes. We really had a lot!

Getting ready to make some spaghetti sauce!

Wednesday, July 27, 2016

Picked a Peck...

Well, I Picked a Peck of (Giant Marconi) Peppers today...


..and then I did what all respectable gardeners do,
I played with them!


Happy Gardening!

Friday, July 8, 2016

Garden Pictures

Looking through gardening books & catalogs is one of my favorite things to do. Perusing the pages of colorful flowers and bountiful fruits and vegetables, daydreaming of what my own garden (farm) will look like someday. 

Today, I'm waiting patiently for the tomatoes and grapes to begin changing color, and for the sunflowers (the first batch anyway) to bloom. 

Here are a few recent pictures of my garden...


Purple Cherokee Tomato 
(see the deep wrinkles and irregular shape)


Medford Tomato 
(bred specifically for the town/area I live in: Medford, Oregon)


Sungold Cherry Tomato
(my absolute favorite tomato, so super sweet)

Nasturtium
(notice how most of the Nasturtium is yellow, but one pink flower, hmm what was the bee doing right before he visited this flower?)


The Grapevine - Black Monukka
(a seedless purple grape)

The Vine is loaded with grapes again this year.


 I love how the grapevine wraps around the chicken coop!


My Daughter caught a Cabbage White Butterfly 
(she held it just long enough for me to take a picture, and then she let it go - the right thing to do)


Sunflower (not sure what variety)


Sunflower bud
(can you see the tiny little hairs?)


Wednesday, June 29, 2016

Earwigs, Pincer Bugs, Ugh!

Picture it. It was the summer of 2015, I was relaxing in my patio chair watching my kids play in the pool and admiring the the beautiful day. Then, out of nowhere a huge pincer bug starts climbing up my leg. Then, out of nowhere another huge pincer bug starts climbing across my arm! They were hiding in the chair cushions - trying to keep cool during the hot summer days. These little bugs were a plague on my garden. They ate the flower buds from my peony before it even opened. They mowed my vegetable garden down in one night. They were in my front yard, my back yard, my patio, my house.....they were EVERYWHERE! 

I was frantic. Hectic. Desperate. At my WITS END! I searched all over the internet for a solution to rid my farm of this nasty pest. Many of the 'solutions' I found involved me staying up at night (when the pests are most active) and catching them. Um, no thank you - that doesn't sound efficient at all. By chance I had a conversation with a fellow master gardener who offered me the holy grail equivalent of pincer bug traps. This method works so well that I just have to share it with the world. I'll admit I was skeptical at first, but I was so desperate I had to give it a try:


You will need, soy sauce, vegetable oil and a small plastic container (single-serving yogurt cups work great). Any brand of soy sauce and vegetable oil works, just buy whatever is on sale - don't use your good stuff. In fact, if you frequent the dollar store I recommend picking up your ingredients there. In your container mix equal parts 1:1 of soy sauce & vegetable oil, leaving room at the top. In my yogurt cups I fill 1/3 soy sauce, 1/3 veggie oil, and 1/3 open air. Place the cups in your garden or wherever you suspect pincer bug activity. You can place your traps any time of day, but pincher bugs are most active at night, so they won't investigate until the sun sets. Here I placed traps right in my veggie bed (burying them in the soil makes it easier for the bugs to climb inside):


The soy sauce is what attracts the bugs, the vegetable oil is what drowns them. Below you can see the bugs on top of the soy sauce, but UNDER the oil...


I put three traps in this raised bed last night and all three traps had over a dozen bugs each when I checked this morning. If you suspect earwig damage in your garden, or if you have them hiding in your patio chair cushions, please give this non-toxic pesticide a try!


Tips: 
This doesn't work well in an area that gets overhead watering, as the traps will fill with water and flood out. You can put a lid on your container and cut holes in the sides near the top so the bugs can still get in.

I empty my traps every few weeks when it gets really full of carcasses and debris. Placing a fresh trap will help determine if you still have pincher bug activity in that particular location.

Slugs are attracted to this mixture too, so you may find a few of those pests as well; however, slugs prefer beer to soy sauce. 


Sunday, June 26, 2016

Southern Oregon Lavender Trail

This weekend marked the 2016 Southern Oregon Lavender Festival. I've been wanting to attend this festival for a few years, and this year I found a wonderful new friend to accompany me on this adventure!  She and I took our daughters and off we went to the Applegate Valley for a day of sunshine, laughter, picnics and of course Lavender!


The Lavender Trail features 4 farms in the Applegate Valley and a 5th destination in the Rogue Valley. The 5th location is the Southern Oregon Research & Extension Center (SOREC). The Lavender Garden at SOREC was planned, planted and is maintained by the Jackson County OSU Master Gardeners (an organization I am proud to belong to). My friend & I didn't stop here today, since I'm very familiar with this garden and was eager to get into the Applegate, but I recommend a stop if you're in the area and have never been. The demonstration gardens are numerous!

Back to the Trail...
Our Lavender Wand

Our first stop - Lavender Fields Forever
We probably spent the most time at this farm, since it was our first stop. They had several classes available (how to make a lavender wand, a lavender wreath, cooking with lavender and more). There were plenty of lavender products to buy (creams, room spray, essential oils, etc.). There were also jewelry & craft vendors selling in the barn, and so much more! We sampled some lavender lemonade, a lavender cookie and tried our hand at making a lavender wand.
Gathering Lavender to Make a Wand
Gathering Lavender - Because it's Fun!


Next Stop - English Lavender Farm
On this farm we sampled more lavender infused lemonade, but this one was infused with strawberries too - YUM! There were plenty of items to purchase. I picked out a lavender eye mask, and a sachet. Little did we know the local news station, channel 12, was filming a segment about the festival. At the end of the day, while we were home relaxing we discovered the girls were captured on film running through the lavender fields!


Then we stopped for pizza at a local spot called Peace of Pizza. The name is cute, the garden patio behind the restaurant was gorgeous & lush, and the pizza was awesome - wood fired and all. We took our pizza to go and ate it picnic-style at the third lavender farm of the day: Applegate Valley Lavender Farm...

This farm was truly a working farm. We ate our pizza in the shade accompanied by all the farm critters, geese, sheep, an old dog, and cows. Afterward we sampled ice cream from the Sweet Cream mobile truck. My favorite was the Lavender Lemon Zest ice cream, the kids both enjoyed the Honeycomb ice cream. The girls marveled at all the tadpoles & dragonflies in the pond, and pet a few sheep.


The weather couldn't have been better - 79 degrees with a light breeze! Off to the last lavender farm...


This lavender farm had many greenhouses and sold several varieties of lavender from 4inch pots to 1 gallon. Here I picked up a sweet little handcrafted piece of pottery from a local artisan. It was the perfect way to end the day and spend the last of my cash on hand! 

My loot - yes, I bought some lavender room spray!

I truly enjoy supporting local farmers, businesses, and artisans. If you're seeking a little adventure, beautiful countryside scenery and the enjoyment of being around friendly people, well the Southern Oregon Lavender Trail is just for you. I'm looking forward to attending again next year. 

Bonus: my car smells like lavender!!


Thursday, June 23, 2016

Master Gardener in Training

The Farm is thriving, and our family too! It's nice to take a break from Homeschooling and adopt a more flexible summer schedule... 

 Always eager to help with the garden..


Tomatoes doing well.


OSU Master Gardener in Training.


Summer On The Farm (June)

This week marks the official beginning of summer, although it's been feeling like summer for over a month. Here are a few highlights of June On The Farm:


 Radishes - the kids helped me pick them.


Radishes - tops removed & initial washing. I pickled the radishes too, Yum!


A Ladybug larvae. 
We had tons of ladybugs this year, thanks to the neighbors tree being full of aphids! 


My sister prompted me to take a picture of my grapevine. It spans a bulk of the fence line on the north side of the backyard and wraps around the chicken coop.


 Daisies, in the front yard. They  look great this year, so I'm looking to plant some more. This variety (not sure what that is) only gets about 1 foot tall.


Russian Sage.


Russian Sage.


Lavender.


Foxglove.

Wednesday, March 9, 2016

Chicken Coop 'DeVille'

Trying to find just-the-right coop for our chicks took some time. I viewed over 100 different coop designs, shopped local farm stores (for pre-built coops and ideas for build-your-own), and I scrolled through Pinterest too! We decided on this coop because it has an attached, covered run. Since we get cold and wet in the winter I wanted the chicks to be able to go outside with out getting rained/snowed on. Also, we have hot summers and a covered run provides excellent shade! 

We (my Husband) built a very nice living environment for them - we call it our Coop 'DeVille'.


We first started with sinking pavers into the ground (burying them on their side). Then, we placed pavers flat on top. This deters rodents and pests (and Butter) from digging under it. It also helps give a nice sturdy flat surface to begin the foundation framing.


Framing.

Nest boxes.

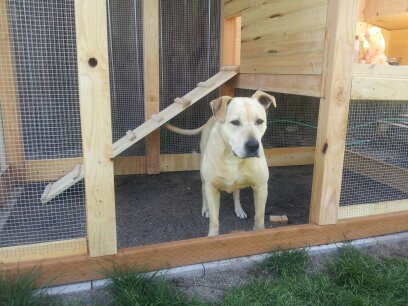
Oh sure, Butter. We get you a dog house for Christmas and you want nothing to do with it,
but as soon as we build a chicken coop you're all over it!


Chickens loving their new home!


Just FYI, I found our free Coop plans on this site: http://www.backyardchickens.com/atype/2/Coops